Lou Reed Lou Reed
About me
3V0-41.22 Key Concepts & 3V0-41.22 Reliable Dumps Questions
P.S. Free & New 3V0-41.22 dumps are available on Google Drive shared by PDFVCE: https://drive.google.com/open?id=19tKwnHROqWuUQp-KgvT5QvWcPtAaJyyZ
You can download the Advanced Deploy VMware NSX-T Data Center 3.X 3V0-41.22 product right after purchasing and start your journey toward your big career. The VMware 3V0-41.22 exam questions are very similar to actual VMware 3V0-41.22 Exam Questions. We provide our valuable customers to try a demo before their purchase to test all features of the VMware 3V0-41.22 certification exam product confidently.
To prepare for the VMware 3V0-41.22 certification exam, candidates can enroll in the VMware NSX-T Data Center: Install, Configure, Manage [V3.0] course. This course covers all the topics tested in the exam and provides hands-on experience in deploying and managing NSX-T infrastructure. Additionally, candidates can use study guides and practice exams to reinforce their knowledge and identify areas for improvement. Passing the VMware 3V0-41.22 exam validates the candidate's skills in deploying and managing VMware NSX-T Data Center 3.X and demonstrates their expertise in virtualized network environments.
VMware 3V0-41.22 Certification Exam is designed to test the knowledge and skills of professionals who are responsible for deploying and managing VMware NSX-T Data Center 3.X environments. This advanced-level certification exam is a part of the VMware Certified Advanced Professional (VCAP) program, and it is intended for experienced VMware professionals who have already gained expertise in virtualization, networking, and security technologies.
Quiz 2025 3V0-41.22: Advanced Deploy VMware NSX-T Data Center 3.X – Valid Key Concepts
The 3V0-41.22 exam prep from our company will offer the help for you to develop your good study habits. If you buy and use our 3V0-41.22 study materials, you will cultivate a good habit in study. More importantly, the good habits will help you find the scientific prop learning methods and promote you study efficiency, and then it will be conducive to helping you pass the 3V0-41.22 Exam in a short time. So hurry to buy the 3V0-41.22 test guide from our company, you will benefit a lot from it.
VMware Advanced Deploy VMware NSX-T Data Center 3.X Sample Questions (Q10-Q15):
NEW QUESTION # 10
Task 15
You have been asked to enable logging so that the global operations team can view inv Realize Log Insight that their Service Level Agreements are being met for all network traffic that is going in and out of the NSX environment. This NSX environment is an Active / Active two Data Center design utilizing N-VDSwith BCP.
You need to ensure successful logging for the production NSX-T environment.
You need to:
Verify via putty with SSH that the administrator can connect to all NSX-Transport Nodes. You will use the credentials identified in Putty (admin).
Verify that there is no current active logging enabled by reviewing that directory is empty -/var/log/syslog-
Enable NSX Manager Cluster logging
Select multiple configuration choices that could be appropriate success criteria Enable NSX Edge Node logging Validate logs are generated on each selected appliance by reviewing the "/var/log/syslog" Complete the requested task.
Notes: Passwords are contained in the user _ readme.txt. complete.
These task steps are dependent on one another. This task should take approximately 10 minutes to complete.
Answer:
Explanation:
See the Explanation part of the Complete Solution and step by step instructions.
Explanation
To enable logging for the production NSX-T environment, you need to follow these steps:
Verify via putty with SSH that the administrator can connect to all NSX-Transport Nodes. You can use the credentials identified in Putty (admin) to log in to each transport node. For example, you can use the following command to connect to the sfo01w01en01 edge transport node:ssh admin@sfo01w01en01.
You should see a welcome message and a prompt to enter commands.
Verify that there is no current active logging enabled by reviewing that directory is empty
-/var/log/syslog-. You can use thelscommand to list the files in the /var/log/syslog directory. For example, you can use the following command to check the sfo01w01en01 edge transport node:ls
/var/log/syslog. You should see an empty output if there is no active logging enabled.
Enable NSX Manager Cluster logging. You can use thesearch_web("NSX Manager Cluster logging configuration")tool to find some information on how to configure remote logging for NSX Manager Cluster. One of the results isNSX-T Syslog Configuration Revisited - vDives, which provides the following steps:
Navigate to System > Fabric > Profiles > Node Profiles then select All NSX Nodes then under Syslog Servers click +ADD Enter the IP or FQDN of the syslog server, the Port and Protocol and the desired Log Level then click ADD Select multiple configuration choices that could be appropriate success criteria. You can use thesearch_web("NSX-T logging success criteria")tool to find some information on how to verify and troubleshoot logging for NSX-T. Some of the possible success criteria are:
The syslog server receives log messages from all NSX nodes
The log messages contain relevant information such as timestamp, hostname, facility, severity, message ID, and message content The log messages are formatted and filtered according to the configured settings The log messages are encrypted and authenticated if using secure protocols such as TLS or LI-TLS Enable NSX Edge Node logging. You can use thesearch_web("NSX Edge Node logging configuration")tool to find some information on how to configure remote logging for NSX Edge Node.
One of the results isConfigure Remote Logging - VMware Docs, which provides the following steps:
Run the following command to configure a log server and the types of messages to send to the log server. Multiple facilities or message IDs can be specified as a comma delimited list, without spaces.
set logging-server <hostname-or-ip-address [:port]> proto <proto> level <level> [facility <facility>]
[messageid <messageid>] [serverca <filename>] [clientca <filename>] [certificate <filename>] [key
<filename>] [structured-data <structured-data>]
Validate logs are generated on each selected appliance by reviewing the "/var/log/syslog". You can use thecatortailcommands to view the contents of the /var/log/syslog file on each appliance. For example, you can use the following command to view the last 10 lines of the sfo01w01en01 edge transport node:tail -n 10 /var/log/syslog. You should see log messages similar to this:
2023-04-06T12:34:56+00:00 sfo01w01en01 user.info nsx-edge[1234]: 2023-04-06T12:34:56Z nsx-edge[1234]: INFO: [nsx@6876 comp="nsx-edge" subcomp="nsx-edge" level="INFO" security="False"] Message from nsx-edge You have successfully enabled logging for the production NSX-T environment.
NEW QUESTION # 11
Task 12
An issue with the Tampa web servers has been reported. You would like to replicate and redirect the web traffic to a network monitoring tool outside Of the NSX-T environment to further analyze the traffic.
You are asked to configure traffic replication to the monitoring software for your Tampa web overlay segments with bi-directional traffic using this detail:
Complete the requested configuration.
Notes: Passwords are contained in the user_readme.txt. This task is not dependent on other tasks. This task should take approximately 10 minutes to complete.
Answer:
Explanation:
See the Explanation part of the Complete Solution and step by step instructions.
Explanation
To configure traffic replication to the monitoring software for your Tampa web overlay segments with bi-directional traffic, you need to follow these steps:
Log in to the NSX Manager UI with admin credentials. The default URL is
https://<nsx-manager-ip-address>.
Navigate to Networking > Segments and select the Tampa web overlay segment that you want to replicate the traffic from. For example, select Web-01 segment that you created in Task 2.
Click Port Mirroring > Set > Add Session and enter a name and an optional description for the port mirroring session. For example, enter Tampa-Web-Monitoring.
In the Direction section, select Bi-directional as the direction from the drop-down menu. This will replicate both ingress and egress traffic from the source to the destination.
In the Source section, click Set and select the VMs or logical ports that you want to use as the source of the traffic. For example, select Web-VM-01 and Web-VM-02 as the source VMs. Click Apply.
In the Destination section, click Set and select Remote L3 SPAN as the destination type from the drop-down menu. This will allow you to replicate the traffic to a remote destination outside of the NSX-T environment.
Enter the IP address of the destination device where you have installed the network monitoring software, such as 10.10.10.200.
Select an existing service profile from the drop-down menu or create a new one by clicking New Service Profile. A service profile defines the encapsulation type and other parameters for the replicated traffic.
Optionally, you can configure advanced settings such as TCP/IP stack, snap length, etc., for the port mirroring session.
Click Save and then Close to create the port mirroring session.
You have successfully configured traffic replication to the monitoring software for your Tampa web overlay segments with bi-directional traffic using NSX-T Manager UI.
NEW QUESTION # 12
Task 16
You are working to automate your NSX-T deployment and an automation engineer would like to retrieve your BOP routing information from the API.
You need to:
* Run the GET call in the API using Postman
* Save output to the desktop to a text file called API.txt
Complete the requested task.
Notes: Passwords are contained in the user _ readme.txt. This task is not dependent on another. This task should take approximately 5 minutes to complete.
Answer:
Explanation:
See the Explanation part of the Complete Solution and step by step instructions.
Explanation
To run the GET call in the API using Postman and save the output to the desktop to a text file called API.txt, you need to follow these steps:
Open Postman and create a new request tab. Select GET as the method from the drop-down menu.
Enter the URL of the NSX-T Policy API endpoint for retrieving the BGP routing table, such as
https://<nsx-manager-ip-address>/policy/api/v1/infra/tier-0s/vmc/routing-table?enforcement_point_path=/ Click the Authorization tab and select Basic Auth as the type from the drop-down menu. Enter your NSX-T username and password in the Username and Password fields, such as admin and VMware1!.
Click Send to execute the request and view the response in the Body tab. You should see a JSON object with the BGP routing table information, such as routes, next hops, prefixes, etc.
Click Save Response and select Save to a file from the drop-down menu. Enter API.txt as the file name and choose Desktop as the location. Click Save to save the output to your desktop.
You have successfully run the GET call in the API using Postman and saved the output to your desktop to a text file called API.txt.
NEW QUESTION # 13
Task 1
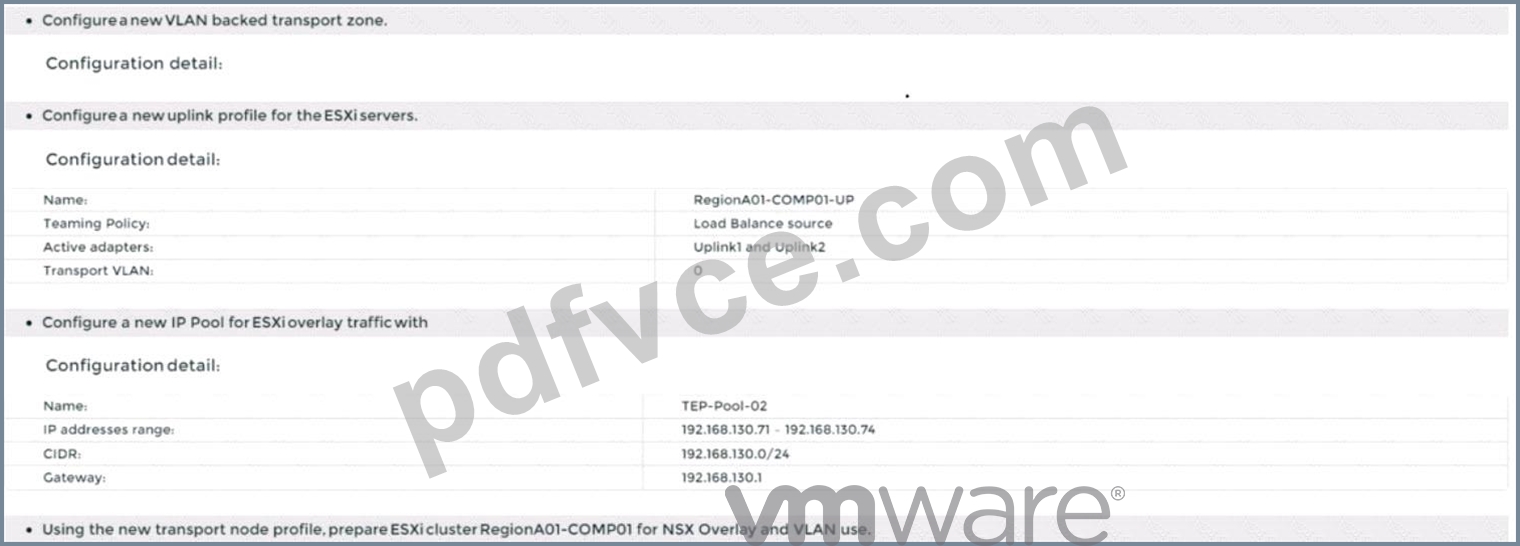
You are asked to prepare a VMware NSX-T Data Center ESXi compute cluster Infrastructure. You will prepare twoESXiservers in a cluster for NSX-T overlay and VLAN use.
All configuration should be done using the NSX UI.
* NOTE: The configuration details in this task may not be presented to you in the order in which you must complete them.
* Configure a new Transport Node profile and add one n-VDS switch. Ensure Uplink1and Uplink 2 of your configuration use vmnic2 and vmnic3 on the host.
Complete the requested task.
NOTE: Passwords are contained in the user_readme.txt. Configuration details may not be provided in the correct sequential order. Steps to complete this task must be completed in the proper order. Other tasks are dependent on the completion Of this task. You may want to move to other tasks/steps while waiting for configuration changes to be applied. This task should take approximately 20 minutes to complete.
Answer:
Explanation:
See the Explanation part of the Complete Solution and step by step instructions.
Explanation
To prepare a VMware NSX-T Data Center ESXi compute cluster infrastructure, you need to follow these steps:
Log in to the NSX Manager UI with admin credentials. The default URL is
https://<nsx-manager-ip-address>.
Navigate to System > Fabric > Profiles > Transport Node Profiles and click Add Profile.
Enter a name and an optional description for the transport node profile.
In the Host Switches section, click Set and select N-VDS as the host switch type.
Enter a name for the N-VDS switch and select the mode as Standard or Enhanced Datapath, depending on your requirements.
Select the transport zones that you want to associate with the N-VDS switch. You can select one overlay transport zone and one or more VLAN transport zones.
Select an uplink profile from the drop-down menu or create a custom one by clicking New Uplink Profile.
In the IP Assignment section, select Use IP Pool and choose an existing IP pool from the drop-down menu or create a new one by clicking New IP Pool.
In the Physical NICs section, map the uplinks to the physical NICs on the host. For example, map Uplink 1 to vmnic2 and Uplink 2 to vmnic3.
Click Apply and then click Save to create the transport node profile.
Navigate to System > Fabric > Nodes > Host Transport Nodes and click Add Host Transport Node.
Select vCenter Server as the compute manager and select the cluster that contains the two ESXi servers that you want to prepare for NSX-T overlay and VLAN use.
Select the transport node profile that you created in the previous steps and click Next.
Review the configuration summary and click Finish to start the preparation process.
The preparation process may take some time to complete. You can monitor the progress and status of the host transport nodes on the Host Transport Nodes page. Once the preparation is complete, you will see two host transport nodes with a green status icon and a Connected state.You have successfully prepared a VMware NSX-T Data Center ESXi compute cluster infrastructure using a transport node profile.
NEW QUESTION # 14
SIMULATION
Task 5
You are asked to configure a micro-segmentation policy for a new 3-tier web application that will be deployed to the production environment.
You need to: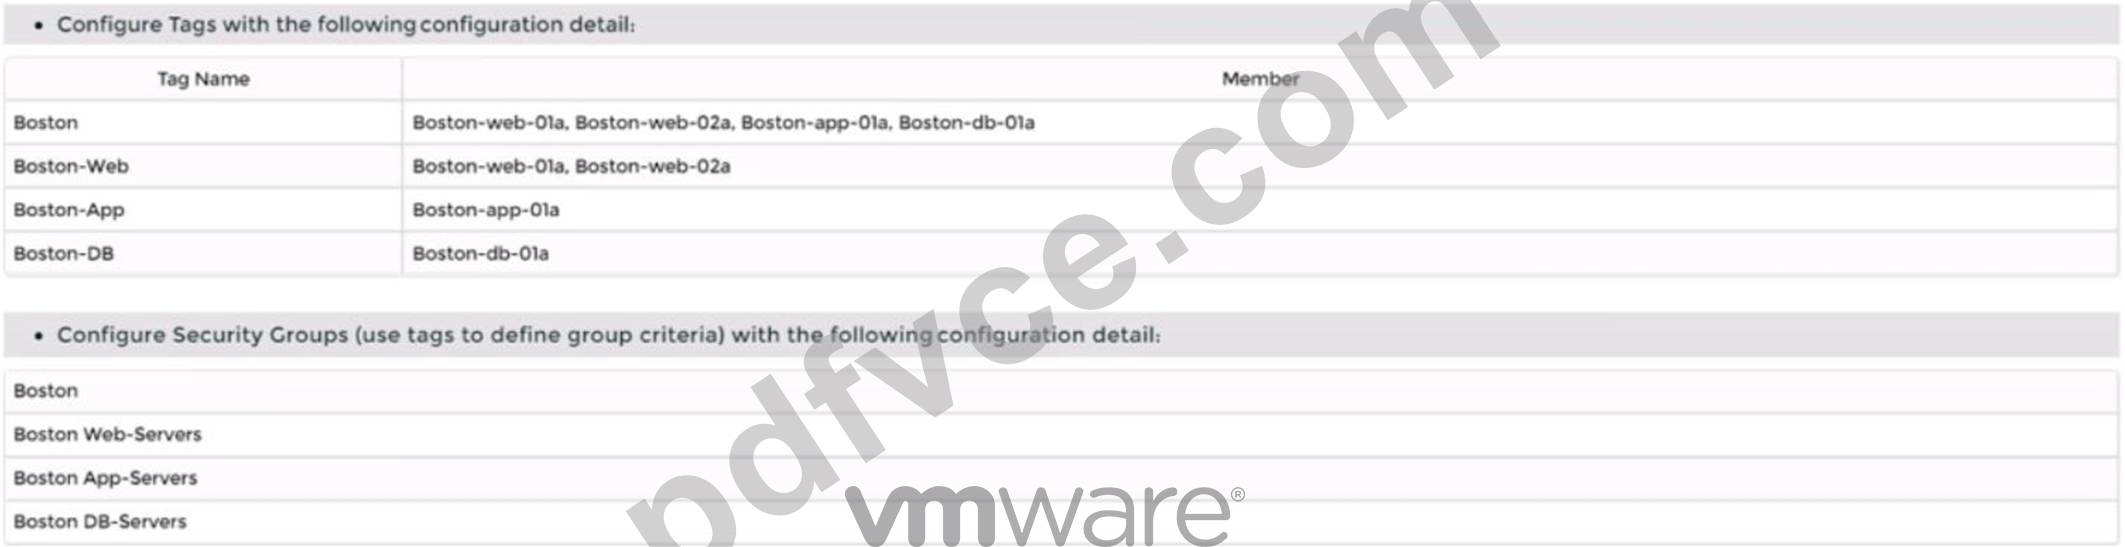
Notes:
Passwords are contained in the user_readme.txt. Do not wait for configuration changes to be applied in this task as processing may take some time. The task steps are not dependent on one another. Subsequent tasks may require completion of this task. This task should take approximately 25 minutes to complete.
Answer:
Explanation:
See the Explanation part of the Complete Solution and step by step instructions Explanation:
Step-by-Step Guide
Creating Tags and Security Groups
First, log into the NSX-T Manager GUI and navigate to Inventory > Tags to create tags like "BOSTON-Web" for web servers and assign virtual machines such as BOSTON-web-01a and BOSTON-web-02 a. Repeat for "BOSTON-App" and "BOSTON-DB" with their respective VMs. Then, under Security > Groups, create security groups (e.g., "BOSTON Web-Servers") based on these tags to organize the network logically.
Excluding Virtual Machines
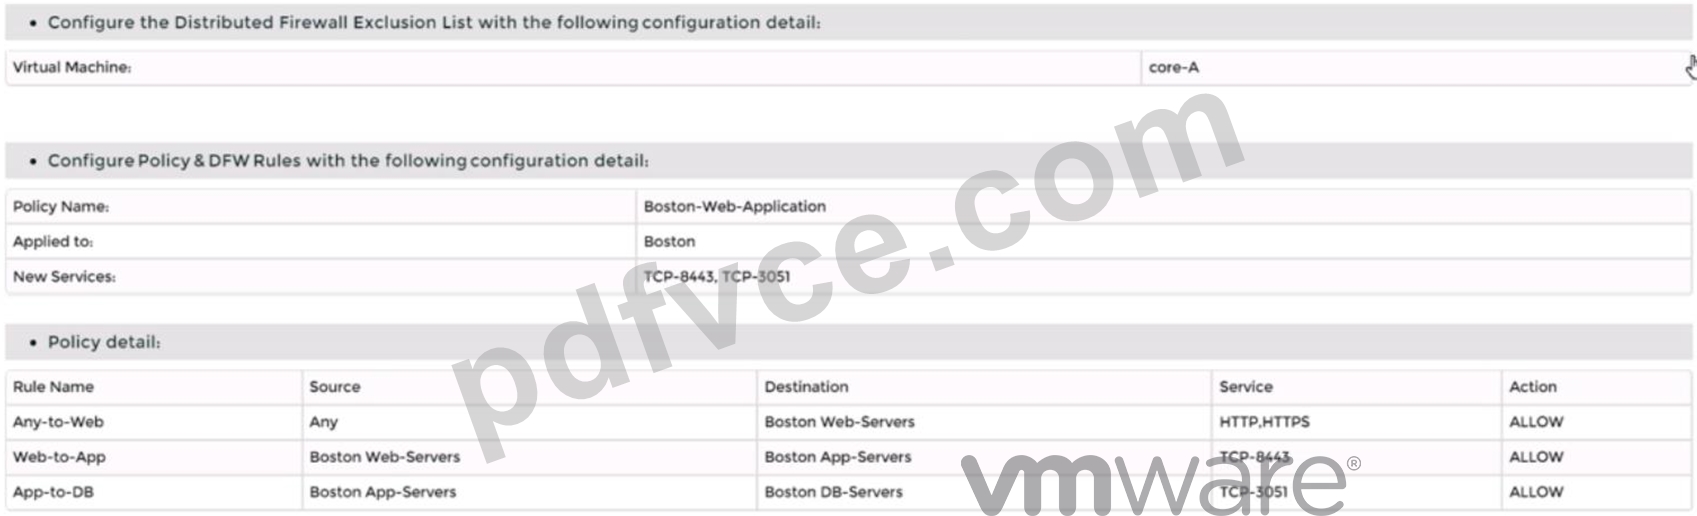
Next, go to Security > Distributed Firewall > Exclusion List and add the "core-A" virtual machine to exclude it from firewall rules, ensuring it operates without distributed firewall restrictions.
Defining Custom Services
Check Security > Services for existing services. If "TCP-9443" and "TCP-3051" are missing, create them by adding new services with the protocol TCP and respective port numbers to handle specific application traffic.
Setting Up the Policy and Rules
Create a new policy named "BOSTON-Web-Application" under Security > Distributed Firewall > Policies. Add rules within this policy:
Allow any source to "BOSTON Web-Servers" for HTTP/HTTPS.
Permit "BOSTON Web-Servers" to "BOSTON App-Servers" on TCP-9443.
Allow "BOSTON App-Servers" to "BOSTON DB-Servers" on TCP-3051. Finally, save and publish the policy to apply the changes.
This setup ensures secure, segmented traffic for the 3-tier web application, an unexpected detail being the need to manually create custom services for specific ports, enhancing flexibility.
Survey Note: Detailed Configuration of Micro-Segmentation Policy in VMware NSX-T Data Center 3.x This note provides a comprehensive guide for configuring a micro-segmentation policy for a 3-tier web application in VMware NSX-T Data Center 3.x, based on the task requirements. The process involves creating tags, security groups, excluding specific virtual machines, defining custom services, and setting up distributed firewall policies. The following sections detail each step, ensuring a thorough understanding for network administrators and security professionals.
Background and Context
Micro-segmentation in VMware NSX-T Data Center is a network security technique that logically divides the data center into distinct security segments, down to the individual workload level, using network virtualization technology. This is particularly crucial for a 3-tier web application, comprising web, application, and database layers, to control traffic and enhance security. The task specifies configuring this for a production environment, with notes indicating passwords are in user_readme.txt and no need to wait for configuration changes, as processing may take time.
Step-by-Step Configuration Process
Step 1: Creating Tags
Tags are used in NSX-T to categorize virtual machines, which can then be grouped for policy application. The process begins by logging into the NSX-T Manager GUI, accessible via a web browser with admin privileges. Navigate to Inventory > Tags, and click "Add Tag" to create the following:
Tag name: "BOSTON-Web", assigned to virtual machines BOSTON-web-01a and BOSTON-web-02a.
Tag name: "BOSTON-App", assigned to BOSTON-app-01a.
Tag name: "BOSTON-DB", assigned to BOSTON-db-01a.
This step ensures each tier of the application is tagged for easy identification and grouping, aligning with the attachment's configuration details.
Step 2: Creating Security Groups
Security groups in NSX-T are logical constructs that define membership based on criteria like tags, enabling targeted policy application. Under Security > Groups, click "Add Group" to create:
Group name: "BOSTON Web-Servers", with criteria set to include the "BOSTON-Web" tag.
Group name: "BOSTON App-Servers", with criteria set to include the "BOSTON-App" tag.
Group name: "BOSTON DB-Servers", with criteria set to include the "BOSTON-DB" tag.
This step organizes the network into manageable segments, facilitating the application of firewall rules to specific tiers.
Step 3: Excluding "core-A" VM from Distributed Firewall
The distributed firewall (DFW) in NSX-T monitors east-west traffic between virtual machines. However, certain VMs, like load balancers or firewalls, may need exclusion to operate without DFW restrictions. Navigate to Security > Distributed Firewall > Exclusion List, click "Add", select "Virtual Machine", and choose "core-A". Click "Save" to exclude it, ensuring it bypasses DFW rules, as per the task's requirement.
Step 4: Defining Custom Services
Firewall rules often require specific services, which may not be predefined. Under Security > Services, check for existing services "TCP-9443" and "TCP-3051". If absent, create them:
Click "Add Service", name it "TCP-9443", set protocol to TCP, and port to 9443.
Repeat for "TCP-3051", with protocol TCP and port 3051.
This step is crucial for handling application-specific traffic, such as the TCP ports mentioned in the policy type (TCP-9443, TCP-3051), ensuring the rules can reference these services.
Step 5: Creating the Policy and Rules
The final step involves creating a distributed firewall policy to enforce micro-segmentation. Navigate to Security > Distributed Firewall > Policies, click "Add Policy", and name it "BOSTON-Web-Application". Add a section, then create the following rules:
Rule Name: "Any-to-Web"
Source: Any (select "Any" or IP Address 0.0.0.0/0)
Destination: "BOSTON Web-Servers" (select the group)
Service: HTTP/HTTPS (predefined service)
Action: Allow
Rule Name: "Web-to-App"
Source: "BOSTON Web-Servers"
Destination: "BOSTON App-Servers"
Service: TCP-9443 (custom service created earlier)
Action: Allow
Rule Name: "App-to-DB"
Source: "BOSTON App-Servers"
Destination: "BOSTON DB-Servers"
Service: TCP-3051 (custom service created earlier)
Action: Allow
After defining the rules, click "Save" and "Publish" to apply the policy. This ensures traffic flows as required: any to web servers for HTTP/HTTPS, web to app on TCP-9443, and app to database on TCP-3051, while maintaining security through segmentation.
Additional Considerations
The task notes indicate no need to wait for configuration changes, as processing may take time, and steps are not dependent, suggesting immediate progression is acceptable. Passwords are in user_readme.txt, implying the user has necessary credentials. The policy order is critical, with rules processed top-to-bottom, and the attachment's "Type: TCP-9443, TCP-3051" likely describes the services used, not affecting the configuration steps directly.
Table: Summary of Configuration Details
Component
Details
Tags
BOSTON-Web (BOSTON-web-01a, BOSTON-web-02a), BOSTON-App (BOSTON-app-01a), BOSTON-DB (BOSTON-db-01a) Security Groups BOSTON Web-Servers (tag BOSTON-Web), BOSTON App-Servers (tag BOSTON-App), BOSTON DB-Servers (tag BOSTON-DB) DFW Exclusion List Virtual Machine: core-A Custom Services TCP-9443 (TCP, port 9443), TCP-3051 (TCP, port 3051) Policy Name BOSTON-Web-Application Firewall Rules Any-to-Web (Any to Web-Servers, HTTP/HTTPS, Allow), Web-to-App (Web to App-Servers, TCP-9443, Allow), App-to-DB (App to DB-Servers, TCP-3051, Allow) This table summarizes the configuration, aiding in verification and documentation.
Unexpected Detail
An unexpected aspect is the need to manually create custom services for TCP-9443 and TCP-3051, which may not be predefined, highlighting the flexibility of NSX-T for application-specific security policies.
Conclusion
This detailed process ensures a robust micro-segmentation policy, securing the 3-tier web application by controlling traffic between tiers and excluding specific VMs from DFW, aligning with best practices for network security in VMware NSX-T Data Center 3.x.
NEW QUESTION # 15
......
As is known to us, a suitable learning plan is very important for all people. For the sake of more competitive, it is very necessary for you to make a learning plan. We believe that the Software version of our 3V0-41.22 actual exam will help you make a good learning plan which is a model test in limited time simulating the Real 3V0-41.22 Exam, if you finish the model 3V0-41.22 test, our system will generate a report according to your performance.
3V0-41.22 Reliable Dumps Questions: https://www.pdfvce.com/VMware/3V0-41.22-exam-pdf-dumps.html
- 2025 VMware 3V0-41.22: High Hit-Rate Advanced Deploy VMware NSX-T Data Center 3.X Key Concepts 🥦 Search for 「 3V0-41.22 」 on [ www.real4dumps.com ] immediately to obtain a free download 🛶Reliable 3V0-41.22 Exam Tips
- 3V0-41.22 Key Concepts Imparts You the Best Knowledge of 3V0-41.22 Exam 🌄 Search for “ 3V0-41.22 ” and download it for free on ▛ www.pdfvce.com ▟ website 🩱Flexible 3V0-41.22 Learning Mode
- Free 3V0-41.22 Study Material 📢 Latest 3V0-41.22 Exam Preparation 🅾 Valid 3V0-41.22 Test Vce 🍑 Search for ➡ 3V0-41.22 ️⬅️ on ⏩ www.examsreviews.com ⏪ immediately to obtain a free download 👗Free 3V0-41.22 Study Material
- 2025 VMware 3V0-41.22: High Hit-Rate Advanced Deploy VMware NSX-T Data Center 3.X Key Concepts ⛪ The page for free download of ▛ 3V0-41.22 ▟ on ⮆ www.pdfvce.com ⮄ will open immediately 🔦Reliable 3V0-41.22 Exam Tips
- Reasonable 3V0-41.22 Exam Price 🥐 3V0-41.22 Dump Collection 🐌 3V0-41.22 Exam Cost 🔃 Search for ➠ 3V0-41.22 🠰 and download exam materials for free through ▛ www.lead1pass.com ▟ 📜Answers 3V0-41.22 Free
- 100% Pass Quiz VMware - Professional 3V0-41.22 - Advanced Deploy VMware NSX-T Data Center 3.X Key Concepts 🕷 Simply search for ✔ 3V0-41.22 ️✔️ for free download on “ www.pdfvce.com ” 🏧3V0-41.22 Reliable Exam Cram
- 3V0-41.22 Dump Collection 👗 Latest 3V0-41.22 Exam Preparation 🦰 3V0-41.22 100% Exam Coverage 🐎 Search for ▛ 3V0-41.22 ▟ on ➡ www.torrentvalid.com ️⬅️ immediately to obtain a free download 🙌Answers 3V0-41.22 Free
- 3V0-41.22 Reliable Exam Cram 🛒 Answers 3V0-41.22 Free 🛬 3V0-41.22 Dump Collection 🚄 Open ⏩ www.pdfvce.com ⏪ and search for [ 3V0-41.22 ] to download exam materials for free 🕎3V0-41.22 Dump Collection
- Valid 3V0-41.22 Test Forum 🍤 Accurate 3V0-41.22 Prep Material 📿 Reasonable 3V0-41.22 Exam Price 📩 Download ⇛ 3V0-41.22 ⇚ for free by simply entering [ www.free4dump.com ] website 🔣3V0-41.22 Exam Cost
- New 3V0-41.22 Braindumps Sheet 🌖 3V0-41.22 Reliable Exam Cram 🔻 3V0-41.22 PDF VCE 🍘 Search for “ 3V0-41.22 ” and obtain a free download on ⏩ www.pdfvce.com ⏪ 🟦3V0-41.22 Exam Cost
- VMware 3V0-41.22 Pre-Exam Practice Tests | www.prep4sures.top 🅰 Search for ▶ 3V0-41.22 ◀ and obtain a free download on ▶ www.prep4sures.top ◀ 🏛Reliable 3V0-41.22 Exam Tips
- 3V0-41.22 Exam Questions
- lynda-griffiths.wbs.uni.worc.ac.uk casmeandt.org cucourses.trublo.com tutor.mawgood-eg.com avangardconsulting.com meditationchallenges.com studentsfavourite.com erp.thetechgenacademy.com lifedreamdesign.com ac.moalmacademy.com
2025 Latest PDFVCE 3V0-41.22 PDF Dumps and 3V0-41.22 Exam Engine Free Share: https://drive.google.com/open?id=19tKwnHROqWuUQp-KgvT5QvWcPtAaJyyZ
0
Course Enrolled
0
Course Completed